English | 日本語 | 简体中文 | 繁體中文 | 한국어 |
🚀 Quick Start: Getting Started with ZYC.Framework Host
This guide will walk you through creating a ZYC.Framework Host project from scratch. You will learn how to integrate the framework via NuGet and use the modular system (Module + UserControl) to mount your custom UI into the host environment. 🛠️
Recommended: Create with the dotnet tool
Install or update the ZYC.Framework CLI tool:
dotnet tool install --global ZYC.Framework.CLI --version 1.5.6
# If the tool is already installed:
dotnet tool update --global ZYC.Framework.CLI --version 1.5.6
Create a minimal host project:
zyc new WpfApp1
The default project template is minimal, which generates the same host shape described in the manual section below. You can also pass the template explicitly:
zyc new WpfApp1 --template minimal
Use modular when you want a solution with an Entry project, a module project, and an Abstractions project:
zyc new MyCompany.Tools --template modular
Useful options:
zyc new MyCompany.Tools --output ./MyCompany.Tools --package-version 1.5.6
Open the generated solution or project, set it as the startup project, and start debugging. The generated files already include the package reference, Module.cs, ModuleConfig.json, and an initial view.
Manual Creation Method
The following steps show the equivalent setup if you want to create the host project by hand.
1. 🧱 Project Setup & Prerequisites
- Create Project: Create a new WPF Application targeting .NET 10 (e.g., name it
WpfApp1). ✨ - Add NuGet Package: Install the core framework package
ZYC.Framework.Alphavia NuGet Package Manager. 📦
<ItemGroup>
  <PackageReference Include="ZYC.Framework.Alpha" Version="1.5.6" />
</ItemGroup>
- Clean Up Default Entry Point: 🧹
The framework provides its own unified entry point (
Entry.cs). You must delete the following default files generated by the template:
App.xamlApp.xaml.cs
Important
⚠️ Critical Step: You must delete App.xaml, otherwise a global entry point conflict will occur. The framework will take full control of the application startup logic.
2. ⚙️ Configure Assembly References
To ensure the host correctly identifies and loads the abstraction interfaces, manually add the reference to the Abstractions assembly in your .csproj file: 🔗
<ItemGroup>
  <Reference Include="ZYC.Framework.Abstractions">
    <HintPath>$(OutputPath)ZYC.Framework.Abstractions.dll</HintPath>
  </Reference>
</ItemGroup>
3. 🛠️ Implement the Business Module (Module.cs)
Create a Module.cs file in your project root. This class acts as the "brain" of your module, defining loading logic and registering UI pages to the host. 🧠
using Autofac;
using ZYC.Framework.Abstractions.Tab;
using ZYC.CoreToolkit;
using ZYC.CoreToolkit.Extensions.Autofac;

namespace WpfApp1;

internal class Module : ModuleBase
{
    public override Task LoadAsync(ILifetimeScope lifetimeScope)
    {
        // Optional: Attach the built-in debugger tools
        DebuggerTools.Attach();

        // Resolve the Tab Manager and register your UI component
        var simpleTabItemFactoryManager = lifetimeScope.Resolve<ISimpleTabItemFactoryManager>();
        simpleTabItemFactoryManager.Register(new SimpleTabItemFactoryInfo(typeof(UserControl1)));

        return base.LoadAsync(lifetimeScope);
    }
}
4. 🎨 Create the UI Component
Create a new UserControl1 (WPF User Control) and add the [Register] attribute. This allows the framework's Dependency Injection (DI) container to automatically recognize and manage it. 🖥️
using ZYC.CoreToolkit.Extensions.Autofac.Attributes;

namespace WpfApp1;

[Register] // Automatically register to DI container
public partial class UserControl1
{
    public UserControl1()
    {
        InitializeComponent();
    }
}
5. 📄 Add Module Configuration
Create a ModuleConfig.json file in the project root. This file serves as a "map" for the host, telling it which assemblies to load dynamically. Configure your project to copy it to ../settings/ModuleConfig.json relative to the main executable. ⚙️
- File Content:
{
  "AdditionalAssemblyNames": [
    "WpfApp1.dll"
  ],
  "DisabledAssemblyNames": []
}
- Project Item Settings: 📌
Add the following configuration to your
.csprojfile soModuleConfig.jsonis generated into../settings/ModuleConfig.jsonduring build:
<ItemGroup>
  <None Update="ModuleConfig.json">
    <CopyToOutputDirectory>Always</CopyToOutputDirectory>
    <Link>../settings/ModuleConfig.json</Link>
  </None>
</ItemGroup>
💡 Tip:
AdditionalAssemblyNamesmust include the name of the assembly that contains yourModule.cs.
6. ▶️ Run and Debug
- Set Startup Project: Set this WPF project as the Startup Project of your solution.
- Start Debugging: Press
F5.
🎉 Expected Result:
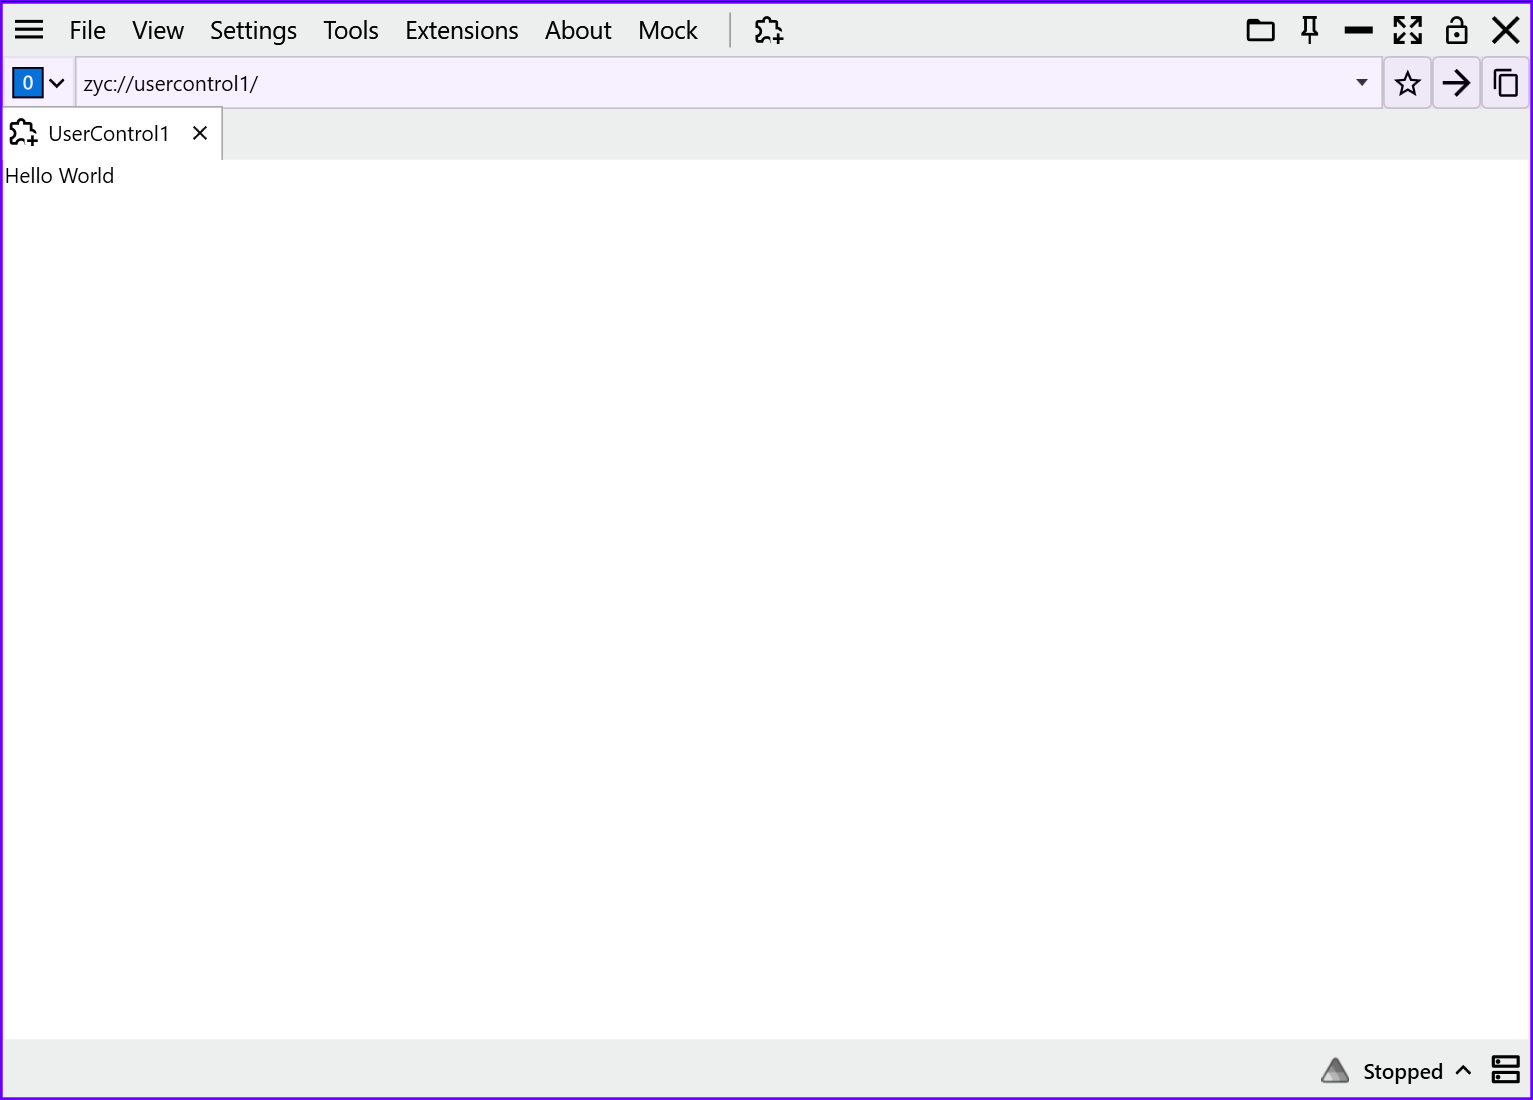
The host will launch, scan ModuleConfig.json, and load the WpfApp1 module. Your registered UserControl1 page will automatically appear as a new tab in the main interface!